Friday, December 31, 2010

Handmade Christmas revealed!

When I first flipped through Wenlan Chia's book Twinkle Sews, one of the first projects on my to-do list was the On The Sidelines sweatshirt.  I basically copied the version from the book, making the sweatshirt up in a nice beige colour and adding some studs I found at Dressew in Vancouver ($0.25 for a package of 35!).  I ended up making 2 versions of this project, with the intent of giving both of them away to my sisters-in-law for Christmas.

For J's version, I added a self-drafted hood since she prefers hoodies over sweatshirts.  I also increased the length of the sleeves to full-length (as opposed to the 3/4 length sleeves in the pattern).  I'm not sure what the deal is with the waistband at the bottom of the top, but I shorted it by several inches and it was still WAAAAY too big, so I ended up adding a drawstring so it could be cinched up.

Bunnyhug / Hoodie version for Jana
I plan to give the sweatshirt version to my other sister-in-law, but since she lives in England I won't be able to give it to her until next summer when she comes home for her wedding.  I haven't had a chance to sew the buttons on it yet, but now that I have my fancy new Janome sewing machine, button-holes are no longer a problem for me.  Woot woot!
Sweatshirt version for Caleigh - try and act surprised!
I also made a nice wrap dress for my mom using the Crepe pattern from Colette.  My mom's favorite colour is royal blue, so I found this fabric (in the clearance centre, funny enough) that I knew would be just perfect.  Sorry the photos aren't that great of quality.  She also just threw it on over what she was already wearing so it's kind of hard to see the dress.  But I promise it's really nice!  She was so happy and is excited to wear it in the spring.
My mom showing off the front of the dress, plus my in-laws' dog says hello!

Back view of the dress, plus my mother-in-law with some turkey action in the background

I also made a purse for my husband's nana, as well as a hot water bottle cover for his great-aunt.  I can't seem to find photos of either of them at the moment, but I know I did take some!  Anyways, it's New Year's Eve tonight (not typically one of my favourite nights, it always seems to be a let-down), but it should be alright.  We're going to some friends' place for a house party, so I'd better scoot and get ready.  Hope all 5 of you that might possibly read this have a safe, healthy and happy 2011!
xoxox


Wednesday, December 29, 2010

Holiday Wrap Up

We've just arrived back home after spending nearly a week at my husband's parents house in the North Okanagan.  We had a lovely Christmas, filled with FAR too much food and drink.  To help detox our bodies I made my favourite lentil soup and a big spinach salad for dinner.  I can't quite remember where the recipe came from, but I think it might've been a Moroccan-style cookbook I borrowed from the library a few years ago.  I will share it here anyways, but please let me know if you know where the recipe came from so I can give proper credit:

Lentil Soup with Lemon (serves 4)
3 tbsp olive oil
1 large onion, chopped
2 cloves garlic, minced
1 tbsp tomato paste
1 tsp ground cumin
1/4 tsp salt
1/4 tsp ground black pepper
1/8 tsp chili powder
1 32-ounce carton chicken broth
1 cup dried red lentils
1 large carrot, diced
2 tbsp lemon juice
3 tbsp fresh chopped cilantro (optional - I never add it b/c I'm not a big cilantro fan)
1 pinch chili powder

  • Put first 8 ingredients in large pot over medium heat for 2 minutes
  • Stir in next 3 ingredients, bring to boil over high heat, then reduce heat to medium-low, cover and simmer for 30 minutes
  • Add the lemon juice, cilantro and chili powder.  Serve!  Yum yum!
  • I usually add an extra tbsp of lemon juice at the end because I like it quite lemony, and I often throw in a bit more garlic.
I was very lucky this Christmas since my husband surprised me with a brand new sewing machine!!!  He did a whole bunch of research online and talked to several knowledgeable sources (i.e., his nana, aunt, mother, and my dad and step-mother) and they ALL recommended the Janome brand.  I am now the proud owner of the Janome 3160 QDC!!!!  I haven't had much of a chance to use it yet (since we just arrived home a few hours ago) but I did practice threading the machine and tried out a few of the embroidery stitches on some scrap fabric.  I am positively drooling thinking of all the fun embellishments I can add on projects now.

I accidentally forgot my camera in Vernon, but will post later about my Handmade Christmas since all my photos are on said camera :-(  I made the Colette Crepe dress for my mom, a modified On The Sidelines sweatshirt for my sister-in-law from the fabulous Twinkle Sews book, and a cozy fleece cloche hat for my other sister-in-law and my mother-in-law.  Everyone liked their gifts and I had lots of fun (and tears - on the sweatshirt) making them!

Monday, December 6, 2010

Turban Headbands!

I'd been thinking for awhile now about making a turban-style headband... lo and behold Burdastyle read my mind and posted this article last week!  That's it!  I finally went for it on Friday!  They were so quick and easy that I ended up making two of them in one evening!

Originally I started following this video by New York Design Shop, using the 8" x 24" measurements in the video, but quickly found the turban to be WAY too tight.  I suppose the fabric I chose wasn't stretchy enough...  But it is a great project anyways!

For my version you will need:

  • Stretchy-knit fabric like a t-shirt, etc. (I found a royal blue velour zip-up bunnyhug at Value Village for $4!)
  • Thread (duh)
  • Sewing machine that can do a stretch-stitch, or you can hand-sew it...  (I'm impatient and HATE hand-sewing)


Step 1.  Measure out two 8" by 24" rectangles.  I used fabric from the back of the jacket.

Step 2.  Fold each rectangle in half lengthwise, right sides together (read: "right side" means the part of the fabric that you want to show on the outside of the finished headband). Sew a straight line down the long side so you create a tube.  Turn the fabric tube inside out so that your raw ends are on the inside.

Step 3 (Optional).  On one of my turban-style headbands I decided to add some embellishment.  I found these round studs at Dressew in Vancouver.  I simply pushed them through the top layer of the tube and then folded the little teeth to secure them.  It was pretty easy to reach inside the tube and add the studs since I placed them near the opening on both ends of the tube.  Since there is another layer of fabric underneath the studs (between the outside and the part sitting against the head) it should be nice and comfy!

Step 4.  Since my fabric had a finished edge along what used to be the bottom hem of the jacket, I simply tucked the raw edges end of the tube inside the finished edge.  Sew a straight line to join the two ends together.  You will now have a circular tube, and it will look like a headband!
 
Step 5.  I made another (smaller) tube using the same method as Step 2 and then wrapped it over the joined ends (as per Step 4) to hide the joined ends so it looks like a continuous headband with a "knot" in the front.  I secured the smaller "wrap" tube in the same way as Step 4 by tucking the raw edges inside the hemmed edge.  To keep the "knot" from sliding around, I hand-tacked (read: hand-sewed) a few stitches on the back.

Headband #1 all finished!

Headband #2 all finished!
Lovin' the studs!
Donezies! 
Easy peasy!  I love the look of the headbands, they look so chic and the studs add just the right amount of bling!

A Belated November Update...

Aaarg!  I am still trying to get the hang of this blogging thing (geez I sound like an old lady sometimes, ha ha ha)...  I wrote the LONGEST post last week, complete with lovely photos and hyperlinks galore when the entire thing crashed on me and deleted all my hard work!  Grrr....  So I had to give my temper some time to cool off before trying to write another post!

Back in November on Remembrance Day long weekend, N and I drove down to the coast to visit some friends in Squamish.  We also took a day trip into Vancouver where I experienced my sewing / crafty nirvana... Dressew!!!  I read the reviews online so I sort of knew what to expect; many cheap fabrics, lots of costume stuff, and SOOOO much notions (which are all in the basement).  Most of the online reviews said the staff was super unfriendly, but I didn't find that at all!  The lady who worked in the clearance section of the basement was HILARIOUS and showed me some ridiculous upholstery fabric that had Jesus images all over it - perfect to reupholster your furniture with (lol)!  N and I found meter parking nearby so the clock was literally ticking.  I didn't have much time (only 30 minutes) luckily I had made a list beforehand complete with fabric swatches and fabric amount requirements for my various upcoming projects.  I ended up mostly buying some notions, but did find some fab chocolate brown ultra-suede fabric that I plan to use to (finally!) make a bed-skirt for our king-sized bed.

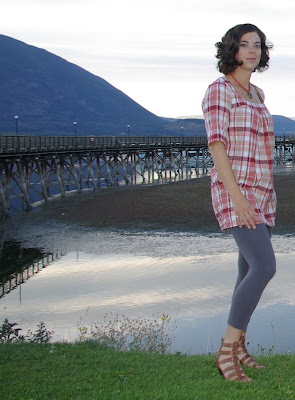
I ended up finding lilac bias-tape and a lilac zipper with which I was able to complete my entry project for Burdastyle's Bernina 3 Series contest (obviously I didn't win, nor did I expect to considering the amazing talent that is out there!) but it was fun and a good learning experience.  I used Burdatyle's Marie skirt pattern in a grey wool fabric I found at a thrift store, and made the top part of the dress from a combination of a few different bodice patterns.  The lilac cotton fabric was also a thrift store score for just a few dollars.  I wanted to make a cool, layered collar but unfortunately didn't have enough fabric.  I was inspired by the Blakely dress by J. Crew, and added a ruffle around the neckline.  I love the result!  N snapped this photo of me just after the first snowfall here in the Southern Interior, and it's actually just water in my martini glass (it's also like 10am in the pic, lol).


We also went with a group of friends to see Harry Potter and the Deathly Hallows one Tightwad Tuesday back in mid-November.  (I am not sure if this is just a Canadian thing, but most theatres offer reduced admission prices on Tuesday evenings across Canada...)  I am a HUGE fan of the novels, and therefore a big fan of the films as well.  I was very pleased with the film version of Deathly Hallows, mostly because they are presenting the story in two films.  I've heard lots of people complaining and saying "it's just a money grab to make two parts".  Obviously these folks have not read the books, because if they had, they would know that there really isn't anything that can be left out.  Otherwise the story wouldn't make sense at all!   This is definitely a dark film (obviously, considering the storyline) but they did an amazing job of injecting humour into the film via the Weasley twins, Ron, and Luna.  Bravo!

I am back to work part-time now (which is nice), and I'm using my spare time to get started on my Handmade Christmas!  Like many people out there, I'm part of a "blended family" so not only do I have my blood-relatives, I also have a step-family, and now in-laws as well!  Not that big of a deal if you're not close with your family, but I am!  I'm also very fortunate to have gained sisters over the years...  I have one younger brother (who I adore) but I've ALWAYS wanted a sister, especially now that I am older and see my friends' amazing friendships with their sisters.  Luckily my husband's sister is totally amazing and she, like me, did not have any sisters growing up.  So now I finally have a sister - yippee!!!  My husband's brother is also engaged to an amazing woman who I am also proud to call my sister, AND my brother is also dating a fantastic girl who I completely adore.  I have been frantically sewing away for all 3 of my sisters and am soooo excited about what I've made for them!  I will be posting more about my Handmade Christmas later since I don't want to ruin any surprises!

I love Christmas (and I also believe in it as well), but I can't stand the mass-consumerism that is associated with it these days...  I like to handmake gifts for friends and family, not only because I can't afford to buy lots of things for people I also find that a handmade gift is much more personal.  What sorts of things do you like to do to show people you love them around the holidays?

Friday, November 5, 2010

Snail Mail, Coffee, and Skype Dates...

Today was a rather bleak and grey November day...  I've been off work for a week now, so I'm trying to keep busy.  We don't have TV so at least I don't spend the days wasting away in front of the tube.  I've been trying to take advantage of this time to sew, and cook and clean, and just generally do things I don't normally have time to do.

I'm thinking about entering Burdastyle's "Party Through the Decades" International Competition, so I've been busy working on my entry for that.  It's nice they opened it up to folks outside of the U.S. and I can't wait to see what people come up with.  I've chosen to do an early 60's inspired look and am hoping to wear it to my husband's staff Christmas party this year.

While I was busy cutting out the fabric this morning, I received a Skype call from my very best friend (and her 3-month-old son) and had a very lovely chat.  It completely made my day!  I miss her a lot; it sucks that British Columbia and Newfoundland are on the complete opposite sides of the country! 

After being considerably cheered up by the Skype chat, I went and got the mail only to find that the 2 Colette patterns I ordered came in!  I've seen tons of great creations on the web, and decided to order the Chantilly and Crepe dress patterns.


I love their vintage inspired looks and have heard nothing but great things about the patterns and the instructions.  My cousin asked me to be a bridesmaid in her wedding next summer and it's going to have a 1940's theme.  I showed her the Crepe dress as a possible bridesmaid dress, and she really liked it.  So I guess we shall see!  I like it well enough that I will probably make myself a few dresses anyways.  The Chantilly dress is so pretty and feminine, plus judging by the Flickr group, I can see that it looks great on a variety of body types.  I've been wanting to make something for my mom for quite awhile now and I think Chantilly will be just the ticket!

My husband sent me a link to this fable the other day.  It's become a bit of a daily mantra for me when things seem bleak.  I hope it will comfort and inspire you as well...
A farmer had only one horse. One day, his horse ran away.


All the neighbors came by saying, “I'm so sorry. This is such bad news. You must be so upset.” The man just said, “We'll see.”

A few days later, his horse came back with twenty wild horses. The man and his son corraled all 21 horses.

All the neighbors came by saying, “Congratulations! This is such good news. You must be so happy!” The man just said, “We'll see.”
One of the wild horses kicked the man's only son, breaking both his legs.

All the neighbors came by saying, “I'm so sorry. This is such bad news. You must be so upset.” The man just said, “We'll see.”

The country went to war, and every able-bodied young man was drafted to fight. The war was terrible and killed every young man, but the farmer's son was spared, since his broken legs prevented him from being drafted.

All the neighbors came by saying, “Congratulations! This is such good news. You must be so happy!” The man just said, “We'll see.”
Here's hoping that if life gives you lemons, you can make lemonade!
xxx

Sunday, October 31, 2010

October Projects Complete!

I managed to finish two new pieces for October in my spare time... A new tunic and a pair of high-waisted jeans.

First up - I made the "Take Manhattan" tunic from the amazing Twinkle Sews book. The book recommended a medium-weight fabric so that it would hang properly. I chose a polyester blend plaid fabric in a neutral palette so I could wear it with lots of different items in my wardrobe. The fabric was on clearance at Fabricland, most likely due to the fact that it was off-grain - which I discovered while trying to cut it out... My step-mother helped me to cut it out and I must say that I am ridiculously pleased with the way all the plaid matches up!  I ended up adding 2 darts / seams down the back of the tunic as the shape of it was way too large for me.  It now is very loose-fitting (as it's meant to be), but not unflattering.


I should also give a shout-out to all the folks in the Burdastyle community for helping me decide which way to orient the fabric for the front pocket. Diagonal was the resounding favourite and it turned out so great! Thanks guys!

My second conquest was a pair of high-waisted, dark denim jeans. What can I say about these? I am so in love. This is honestly the best sewing I have done so far... All the seams matched up perfectly, the top-stitching turned out so well, and they are so comfortable to wear. Plus I didn't even have to rip out a single seam! I am really so pleased to show them to you all!


I used Burdastyle's Bella pattern and made them up in a delicious dark denim which I bought for $11 - don't you just love when Fabricland has sales??? I know I do!  I ended up making the smallest size (32!) since I've heard lots of people say how large the pattern runs and I didn't want to have to deal with tons of alterations since I would probably just screw it up.  I've also attempted this pattern before, making my supposed measurements of a 36 and it ended up being quite large and loose.  Oh well, I will probably gain weight anyways once we start our family!  I only made one small alteration to the pattern this time, I changed the front pockets to make them a bit more rounded, rather than the more angular front pockets on the original pattern.  A few weeks ago some friends asked what I was working on next, and I told them "a pair of high-waisted jeans".  To which my guy friend replied, "ummmm Mom Jeans???".  No, not exactly... ha ha ha.

Tonight we are getting ready to go to our friends' place for a Halloween party. N is going as the Black Knight from Monty Python and the Holy Grail. I made his tunic, but he made everything else himself (including the bloody stump arms), and it's quite good! I will post pictures later.

Happy Halloween everyone!

Saturday, October 23, 2010

Autumn in the Prairies

We drove as far as Calgary the first day and stayed overnight with some friends and had a great visit, sharing some laughs over my hubby's (amazing) homemade beer. The next morning we got up and went to Ikea for the $1 breakfast and purchased 2 new office / desk chairs since I gave away our old table and chairs to the thrift store after purchasing this amazing antique set!


We continued on our way to my beautiful hometown of Saskatoon, just in time for rush hour traffic gridlock on Circle Drive... ugh.... Saskatoon is growing way too fast and the infrastructure cannot support it. It's only going to get worse before it gets better I'm afraid...


The next morning we hopped into the vehicle with my parents and drove out to Kenton, Manitoba where my grandparents' farm is. It was a nice weekend, full of visiting with lots of relatives that I don't get to see very often (being 3 provinces away doesn't help things!).

I also made a wrap-cardigan that I wore during the dinner and family photos. I used Simplicity 2603 (view A) and some blend-knit fabric in a bright purple... I don't know what it is, but I seem to be wearing a lot of purple these days! It was a pretty simple, straight-forward pattern that I was able to whip up fairly quickly... The fabric was soooo slippery though! I wore my favourite buffalo brooch, lovingly crafted by my friend (in real life, as well as the blogosphere) Jillian at The Noisy Plume as the buffalo is a symbol of Manitoba.


Here is a photo of me with my grandparents; incidentally this is the grandmother who taught me to sew. She also made pretty much all of my clothing for me as a small child.

Coming up sewing projects include Christmas gifts, finishing touches on a few things, as well as my first attempt at a jacket (as well as one for N!).

Happy weekend everyone!

Cross-Western Canada Road Trip!

It was my grandparent's 60th wedding anniversary this October, and they had an anniversary supper in Manitoba to celebrate. We decided that flying was too expensive so we drove from our home in the southern interior of BC all the way through the mountains and across the prairies to my parents' home province of Manitoba...


View Fall 2010 Road Trip in a larger map
Here is a map of our route!

Saturday, September 4, 2010

Self Stitched September Lite - Extremely Lite!

Here's a few photos from the first week of my Self Stitched September experience (the lite edition since I don't have enough self-made clothing to participate fully and don't have time at the present to remedy the situation):

September 1 - My self-made yellow blouse, with wide-legged denim capris (store-bought a few years ago).

September 2 - Self-made sweater.

September 3 - Self-made tunic, leggings from Forever 21, and Aldo shoes borrowed from a very chic friend.
September 4 - Self-made jeans, my favourite vintage bunnyhug that I've had for 10+ years.

Summer Sewing Projects - Summary!

As an avid follower of numerous sewing blogs, I have decided to try and follow Zoe's Self Stitched September. When I was laid off work for two months earlier this spring, I became extremely spoiled with tons of time to do all sorts of sewing and managed to create a fair amount of clothing. However, since the end of May I have been working full-time (yay!) and am currently working at a full-time job and a second part-time job; needless to say I don't have much time to sew. Not to mention that this summer was incredibly busy - full of fun things though... camping trips, family vacations, ball tournaments and ultimate frisbee, etc. etc. etc...


I managed to finish this yellow blouse in time for September 1st. It's from Simplicity 9872 (circa 1980) which I found at the thrift store (big surprise!). I used a lovely lightweight cotton-eyelet fabric which was on sale for 70% off earlier this spring. I was originally planning to use it to make a JJ Blouse, but decided that a simpler pattern would show off this pretty fabric much better. This was the first time I've ever used French Seams (a method for encasing lightweight fabric safely within a seam so it doesn't fray. This is a good tutorial on how to do them). The selvege at the bottom of the fabric is a very beautiful scalloped edge, so I didn't need to hem the bottom at all. I very narrowly avoided turning this project into a Fail by not paying proper attention when I was cutting out the fabric (sheesh, will I ever learn?!?!?). I accidentally cut two right sleeves and didn't have enough fabric left to cut a left sleeve. Luckily I managed to find the last remaining bit of the fabric in the remnant bin at Fabricland but it was now $5.50 for 0.8m!!!! I had only paid $3/m a few months earlier - argggg!!!! Oh well, hopefully this will teach me a valuable lesson? :-D


This last photo just cracks me up. My in-laws live on a lake in the Okanagan region of British Columbia and a huge swarm of gnats had just come up from the lake and tried to fly up my nose!


I actually spent a good portion of July and August doing a bit of sewing for our friends' wedding. The bride asked me to do the bridesmaid dress alterations as well as making some sashes for the flower girls' dresses to match the wedding colors. My camera wasn't working the day of the wedding, but here is a photo of my handiwork (all except for the bridesmaid second from the left). The best thing that came out of doing these alterations was the discovery that my 1970s sewing machine does blind-hemming!!! Of course, in typical fashion I didn't discover this until I was nearly finished hand-sewing the hem of the fourth (and final) dress! Oh well... Now I know for future projects, right?


I also did a bit of up-cycling for my hubby. In these tough economic times, his office has decided to save money by not using air-conditioning (which, if you've ever spent any time in the Shuswap during summer you know how hot it gets!). N was lamenting the fact that he had no shorts to wear that were office-appropriate, i.e., not board shorts, so I took him to Value Village and we got a couple pairs of pants that I was able to turn into shorts. These grey plaid shorts are my favourite of the two; they used to be a pair of rather tight, skinny pants that I would imagine some trendy Asian man wearing in Vancouver and looking fab. To accomodate for my non-trendy, tight-pant fearing Interior husband, I had to use some of the extra fabric from the lower portion of the legs (and taking care to match up the plaid) to widen the legs. He says he likes them a lot, and I'm sure of it since he wears them at least 4 days a week! Great success!

Autumn Arrives!

Phew! After an insanely busy summer, September has arrived to bring a bit of a breather from all the hecticness of another beautiful Shuswap summer...

I am looking forward to a bit of Caramia-time this fall to wrap up a few sewing projects for others, as well as doing some apple-picking and canning / preserving stuff from my garden. I am actually on a bit of a deadline with my non-selfish sewing, so I need to get at it!

I was commissioned by a good friend to make her a skirt, and she is leaving for Switzerland at the end of the month to visit her family there so I only have a bit of time to get things all wrapped up! She wanted an A-line style skirt out of a bluey-green cotton voile so I used this free Twinkle by Wenlan pattern and used white binding tape as an accent. The pattern is okay, but I think that having to print it on 50+ pages is a bit extreme, especially when the pattern could probably utilize folding the fabric at the mid-point. Also, the fit seems a bit small - I made a size 12 for my friend even though her measurements were for a size 10 (normally I find most sewing patterns fit best if you make them a size smaller than what your measurements say you are). Anyhoo, it's nearly done, I just have to finish a few seams, put in a zipper (always a challenge for me) and then hem it.

The second unfinished project is a purse for my husband's grandmother who is turning 90 (!!!) on September 11th. She was moaning a few months ago about how she would like a small purse and how everything these days is just so big. (She is actually one of the funniest people I have ever been blessed to know and I completely adore her, so keep in mind that I am often sarcastic when describing her!). I personally am a fan of the large duffel-bag sized purse because I tend to haul around all kinds of stuff with me on a daily basis which probably explains some of my back problems, ha ha ha... I used Butterick 6856 which I've had in my pattern stash for ages, and used a heavy black brocade fabric as well as notions which I've "harvested" from an old Gap purse of mine which is actually worn out. If you didn't think purses could get worn out - think again! I've had this baby for over 10 years and it's been on numerous trips including a 3-month backpacking adventure around Europe in 2008 (see our blog for more details - be warned it's rather detailed!). I would say it's about 3/4 of the way finished; thankfully it's a long weekend so I will actually have time to get some work done on it!

Two of our friends have very recently had babies (i.e., within the past week and a half), so I have a bit more baby clothes to finish up. So far I have made a pair of pants for little M using the leftover fabric from an up-cycle I made for my hubby. I haven't had a chance to sew anything for little S but I am soooo excited to make some baby girls' clothes since everyone seems to have been having boys lately! Oh well, I will add it to the ever-growing To Sew list... I hope you all have a wonderful September and that all good things come your way!
xoxox,
Caramia

Friday, June 4, 2010

Sewing Fails...

Unfortunately we all have them... I think that's what prevents people from becoming avid sewers - one bad experience to sour what could be a wonderful hobby (or more!). I'm definitely still a novice, although perhaps "intermediate beginner" might be a better term. I can follow a pattern, sew many types of fabric, and even am getting the hang at putting in a zipper (!!!), and most of the time I can actually wear the garments I create (ha ha ha). That being said, I don't believe the majority of us are above The Sewing Fail.

My latest Fail (yes, it gets a capital F) was when I tried to create my own version of American Apparel's Le Sac dress. It looked like, well, a sack. (Please excuse the bad hair and lack of makeup - it was early morning but the light was nice). I had all sorts of visions of a stylish dress that could be worn in oh so many different ways - perfect for when I go on backpacking trips for weeks/months at a time. However, reality doesn't always equal your plans... This was the first thing I ever sewed out of jersey fabric, so I didn't realize that I should use a stretch stitch on my machine. Also, the fit was waaaaay too big and super un-flattering. Luckily I was able to salvage the fabric out of it to make a romper (more about that later).
Hopefully you all have more sewing Wins than Fails!

Spring Sewing Projects (Part II)

Back in April I made this top using Simplicity 3964 (another Built By Wendy design - gosh I just love her stuff!). I didn't have any problems with the yoke, but the top is too balloon-y for me... I still need to take it in several inches on either side - hopefully will get to that soon. I also added a tie bottom just in case I wanted to cinch it up rather than just wearing it loose. I might also keep the volume in the top as we are thinking about starting our family soon-ish and it would make a great maternity top... hmmm...


I made some comfy, stretchy straight-leg brown pants from the Built By Wendy: Sew U book. These were actually a muslin for my False Religion jeans, but I ended up finishing the jeans first because I wanted to wear them on a trip to Saskatoon. They were a great learning experience and I will definitely wear them, but the belt loops need a bit of fixing and the crotch kind of looks weird I think... I definitely prefer the jeans.


I like to follow the trends somewhat, although I think I will be giving all the new pants with front pleats a miss... As a child growing up in the 90's I committed some horrendous crimes of fashion involving front pleats and I still can't move past it, so I'm not about to try THAT trend... However, a fun 80's trend that I'm loving for spring/summer is all the rompers featured in the latest fashion magazines. I made this romper for myself out of some jade green jersey that was rescued from a sewing fail. I found the pattern at the thrift store for $0.25 and altered it to make it a bit longer in the crotch as I am quite long in the body. I totally love it! I wore it as a bathing suit cover-up when I went boating with my in-laws the other day - it was perfect!


My best friend is expecting her first child in just over a month, so I figured I better get cracking on the handmade portion of her gift (I found some adorable outfits at the thrift store already that are going into the gift package). I used some leftover cotton blend fabric from a dress I made for myself to create this ridiculously adorable jumper for the little guy. I used Simplicity 6948 (circa 1975), which actually looks a lot like this Oliver+S pattern... Seeing how I paid only $0.25 for my pattern at the thrift store, I'm fine with any differences between my finished garment and the lovely Oliver+S playsuit! Since Gavin will be arriving in late July, I figured size 6 months wouldn't be big enough (since he would be 6 months old in late January and Newfoundland winters are anything but mild), so I had to size it up a bit. I'm not sure if I was too zoned out watching the World Cup game while I was cutting out fabric, but I forgot to increase the size on the back and front facing pieces - oops! So I had to insert a small piece of extra fabric to make the facings fit with the main part of the suit... le sigh... Oh well, it was worth it. I love soccer (or football, heheh).

My sister-in-law is visiting from the UK for a few weeks and she made me some iron-transfer labels for my finished garments. She is an amazingly talented artist, you can check out her stuff here. So I used a large one in Gavin's playsuit and a very small (hardly noticeable) one in the lingerie bag I made for my friend's shower gift. I think they look nice and add an extra personal touch to my creations.